Tuesday 4 December 2012

Ferrero Rocher Flowers

Hi All, hope your week is going fantastically well.  I have some very exciting news to share I have a new addition to my family... a sweet Miniature Daschund named Adam.  He's just over a year old and oh so cute, he's a bundle of energy and keeping me hopping.  So far I haven't managed to take a good photo of him as he's not still long enough... maybe I'll try when he's sleeping.  I've had him just over a week which is why I'm a bit late with this post.

Here is the pot of Ferrero Rocher flowers I made up for the Albany Show, these were my adult version of the Chupa Chups.  The Ferrero's were not as big a hit as the Chupa Chups but I've had fun finishing off the leftovers :O).


I've covered an old metal pail with strips of Retired Bronze Card stock and tied a Midnight Muse Bow around the front.  I've hot glued a bamboo skewer onto a 3/4" circle and adhered to the back of the flowers and then pushed them into Florist Foam in the bottom of the pale.

Project Recipe:
Card: Comfort Cafe DSP, Soft Suede, Midnight Muse, Cajun Craze, Pool Party, Summer Starfruit, Retired Bronze card stock
Big Shot etc: Floral Frames Framelit
Punches: 3/4" Circle
Accessories: Hot Glue Gun, Adhesive, Retired Tool Kit for Anywhere whole punch & hammer,  Midnight Muse Ribbon,


Wednesday 21 November 2012

Chupa Chups up Close

Hiya Everyone, I'm back again and it's been a nice quick turnaround.  One of my best sellers this year at the Albany Agricultural Show was Chupa Chups.  I'm sure lots of you have seen samples out and about in blog land.  Some of the ones I came across were Tanya Bell and Theresa (Tess) Shirmer) aren't they just gorgeous.  I CASED the general idea from these ladies and added my own creative twist.


As you can see I've used the Fun Flowers Die to cut out my flowers, I've then Embossed them using the Elegant Lines Embossing Folder and then sponged the edge for extra dimension.  I've tied some retired ribbon, Striped Wild Wasabi and Certainly Celery Grosgrain to make the leaves and hold the petals up to the chupa chups.

The "vase" I've made by adhereing two Fancy Favour boxes together and adding a belly band of Daffodil Delight card stock, Summer Smooches DSP and Rich Razzleberry Taffeta... mmm just describing it makes me drool.  I've filled the boxes with florest foam and poked straws of varying heights into the foam and then added the Chupa Chups 

I wanted the combination to be bold and bright so I used mainly the brights collection colours and a few in colours thrown in.  Many chupa chups were consumed in the making of this display... lol more than I have eaten in years, I even found the new Magic - Sherbert filled Chupa Chups yummo!!! 

Project Recipe:
Ink:  Brights Collection, In Colours
Card: Brights, In Colours, Summer Smooches DSP
Big Shot etc: Fun Flowers Die, Elegant Lines Embossing Folder
Accessories:  Sponge Daubers, Retired Tool Kit (for anywhere hole punch and mat), Retired Wild Wasabi Striped Ribbon, Retired Certainly Celery 5/8" Grosgrain, Retired Rich Razzleberry Taffeta

Sunday 18 November 2012

Toy Library Stall

Hi All, hope you've had a fantastic weekend with all this lovely sunny weather!  It's been so nice to enjoy the days with a bit of sunshine.  As usual I've been keeping busy and haven't had enough time to keep up with everything.  Thanks to all the lovely ladies who visited me at the Albany Agricultural Show last weekend and the Toy Library stall the weekend before.  It was a lot of fun doing these events and a few late night hours getting ready. 

Here's a look at my set up for the Rainbow Coast Toy Library.  They had a group of ladies all their with trestles set up to raise funds for the local Toy Library.  They held a raffle, to which I donated $50 of items, they also had Cadbury chocolate boxes to sell along with the efforts of all the stall holders.  The day was co-ordinated by Belinda *hi and wave* one of my hostesses.

Here's a quick look at my stall for the day.    It was a lovely day and hopefully the Rainbow Coast Toy Library received some good support.


I had Chupa Chup flowers,Candy Cane pockets, Christmas Punch Art Embellishments and a variety of cards to sell.  I also did up a pretty jar of Ribbons for "Guess how many metres of Ribbon".


I just love how the Chupa Chups came together, they make such an attractive display.  Here's a look at the Christmas Embellishments and some of the item's to show how you can use them in your crafting


Tuesday 6 November 2012

Vintage Love

Hello Everyone,

Hope you are having a fantastic week!  It's sure been fun and fast so far.  You might be wondering at the title of this post but it combined two of my favourite elements of this card.  The Vintage Wallpaper Embossing Folder (I just can't get enough of it) and Love.  This whole card was made with Love in mind, as it was for my parents Wedding Anniversary recently.  I simply loved the sentiment which is from a retired Hostess set called Occasional Quotes.  Congratulations Mum and Dad for making it to this milestone!


It always amazes me how a couple can make a connection in a moment and the legacy from that connection can live forever through their children and grand children.  Most often when I think of this I think of my grand parents.  How if they hadn't made the connection they did or had turned away at any stage.  Their whole family 6 children, 16 grand children and umpteen great grand children wouldn't be who they are today.   

Well that was a bit deeper and more philosophical than I'd planned.  But I decided to go with it... I hope you will too

Project Recipe:
Stamps: Occasional Quotes (retired), Creative Elements
Ink:  Always Artichoke, Raspberry Ripple
Card: Whisper White
Big Shot etc: Vintage Wallpaper Embossing Folder, Apothecary Accents Framelits
Accessories: Basic Pearls, Blender Pen, Stamp-a-ma-jig

Sunday 4 November 2012

Special Occassions

Hiya Everyone,

Phew what a week, not quite sure how I managed to fit everything in this week and there's probably a half a dozen things I've forgotten at least...lol.  Do you ever get like that?  I find I get so much more done when I've got a full slate at work and home.  But when things are quiet time just meanders and I don't get through my chores... 

One thing I don't forget however are those special occasions that occur.  Even though I am the master of the last minute card.  I've had a few of them recently, a very special birthday for Miss Peggy *hi & wave*.  My parents also had a special Wedding Anniversary this year.  So I have a few cards to share for those occasions.

If your like me your a master at the last minute card, even if I'm organised and have a card made and ready.  I always think that I can make one just that bit more special if it's at the last minute...lol.


Project Recipe:
Stamps: Memorable Moments, Stippled Blossoms
Ink:  Blushing Bride, Rose Red, Lucky Limeade, Old Olive
Card: Blushing Bride, Whisper White, Riding Hood Red, Twitterpated DSP
Big Shot etc: Window Frames Collection Framelits
Punches: Scallop Trim Border
Accessories: Stamp-a-ma-jig, Basic Pearls, Paper Snips, Dimensionals

Thursday 1 November 2012

Black & White

Hiya All,

I'm back again in record time too.  What is it about the Black and White colour scheme that always seems so elegant.  It is really so simple to put together but it is always so striking.  One of my challenges for last months Stamp Club was a wedding card.  For some reason wedding cards usually bring on a case of card makers block, but this time I knew just what I wanted to do.


I really love the Loving Thoughts sentiment stamp set it's so versatile and I love how the letters flow.  It's sure been getting a work out.  I couldn't resist the Basic Black/Grey Striped Satin ribbon that's in the Holiday Catalogue p26.  I wanted to make a project with it that wasn't Halloween related and this was just perfect.

Even though it's a bit hard to see the Delicate Doilies are layered one on top of the other, Large, Middle sized and then smallest.  No that's not dust specks on the camera lens those little specks on the black are actually the sparkle from the Shimmer Spritz.  Sorry that's just my poor photography skills... lol.

Project Recipe:
Stamps: Loving Thoughts
Ink:  Basic Black
Card: Whisper White, Basic Black
Big Shot etc: Large Delicate Doilies
Accessories: Basic Black/Gray Striped Satin Ribbon, Rhinestone Jewels, Shimmer Spritz Isocol & Frost White Shimmer Paint), Adhesive, Dimensionals

Sunday 28 October 2012

Elegant Butterfly

Hey All, sorry it's been a while since my last post.  I've got plenty of photo's and projects to show you and hopefully I'll be able to get them into blogland shortly.  I've been flat out recently with classes and life in general.  I've had a trip up to Katanning to welcome my folks home from a spot of travelling and for my niece Jaymee-Lee's birthday and my folks Wedding Anniversary.

Plus all in there I've been getting ready for some stalls I'm having shortly one 2nd November for the local Toy Library at North Road Shopping Centre.  The second is the Annual Albany Show stall that Cathy Clark and I hold together.  I'm juggling quite a few balls at the moment please forgive me if I am not keeping up with my blogging.

Well enough news it's time to get to the good stuff a card...  Here's a card we made at Stamp Club recently it uses one of my favourite new punches from the Annual Catalogue, the Elegant Butterfly Punch.  I love it so much it's so beautiful and well elegant pardon the pun.


Project Recipe:
Stamps: Petite Pairs
Ink:  Rich Razzleberry
Card: Daffodil Delight, Whisper White, Baja Breeze, Rich Razzleberry, Floral District DSP
Big Shot etc: Perfect Polka Dots Embossing Folder
Punches: Elegant Butterfly, Itty Bitty Shapes Punch Pack, 1 1/4" Square
Accessories: Basic Pearls, Tombow Glue, Stamp-a-ma-jig


Wednesday 10 October 2012

Betsy's Blossoms

Here's a sweet little gift bag made from a C5 Envelope, the bag was designed to hold 3 little gift cards and all 4 projects were made using the Betsy's Blossom Stamp Set.  The gift bag is one that I've made many time's over although usually I use a C6 envelope.  You simply cut the top flap the one with the resealable tape off.  Score each side and bottom of the envelope and fold the corners out to make the gift bag.  You can make handles using ribbon for bigger bags, or for smaller bags use a Library Clip (yes they are retired, but hopefully you still have one or two in your stash).


Project Recipe:
Stamps: Betsy's Blossom, Creative Elements
Ink:  Old Olive, Tangerine Tango, Baja Breeze
Card: Whisper White,
Punches: Blossom
Accessories: White C6 Envelope, Simply Scored, Basic Pearl, Baja Breeze Seam Binding Ribbon, Library Clip (retired), Paper snips, dimensionals, adhesive


Monday 8 October 2012

It's Spool Time

Hiya All, sorry I'm a bit late posting this week, my computer is on the fritz.  It's being extremely slow and difficult.  It's taken me 45 minutes plus to send a simple email tonight so I'm going to bite the bullet and take it into the computer tech guys and hopefully they can work some magic for me.


This months promotion is called "It's Spool Time" and it's all about ribbon. Simply spend $60 on Stampin' Up! products and receive a spool of Stitched Satin Ribbon in one of the 2012-2014 In Colours. A nice way to get all the colours would be to get 5 friends together and each spend $60 and you can get all 5 colours of Ribbon and share it out between you. You'd each get 1.8metres of Ribbon in each of the colours plus the hostess will receive $50 in Hostess Dollars to spend.

Saturday 29 September 2012

Catty Launch Continued

I'm back again with the lucky last card from the Catty Launch.  I'm making up for lost time with the blogging so get set for a few more surprises.  The first card is one I CASED from Kylie Leusciatti's shoebox swap.  It gave me some inspiration at just the right time. 


Kylie CASED her card from Mary Fish so check out Mary's original card at her blog Stampin' Pretty.

Project Recipe:
Stamps: Loving Thoughts
Ink:  Midnight Muse, Soft Suede
Card: Midnight Muse, Summer Starfruit, Soft Suede, Comfort Cafe DSP
Big Shot etc: Vintage Wallpaper Embossing Folder
Punches: Scallop Trim, Blossom, Boho Blossom, 1 1/4" Square
Accessories: Simply Scored, Sponge Dauber, Basic Pearl, Vintage Crochet Trim

Thursday 27 September 2012

Snowflake Wonder

I'm back again as promised with one of the projects we made at the Catalogue Launch.  It's no surprise here that we don't get snow at Christmas here in Australia.  I think that's why I'm so drawn to snowflake's because it's something very rarely seen.  As soon as I saw the Snow Flurry die in the Holiday Catalogue I knew that it was on my MUST have wish list.

The card we made was a CASE from a class I went to in Vancouver with the very talented Kari Metzger.  As we didn't have snowflake dies or punches I had no way to recreate this card for a class.  Check out Kari's original card below.  I couldn't find the right post on her blog with pictures so I took a photo of the one I made at her class.


It's such a gorgeous card and inside it's a pop up card too, you can't quite make out all the inner workings but it's still pretty.  If you like Kari's style check out her blog at The Stampin' Grounds.


So now that you've seen my inspiration here is the card that we made at the Catty Launch.


Project Recipe:
Stamps: Tiny Tags
Ink:  Early Espresso
Card: Early Espresso, Crumb Cake, Marina Mist, Very Vanilla
Big Shot etc: Lacy Brocade Embossing Folder, Snow Flurry Die
Punches: Jewellery Tag
Accessories: Stampin' Pierce Mat, Piercing Tool, Sponge Dauber, Vintage Trinkets, Crumb Cake Scallop Tulle Ribbon, Dimensionals.


Wednesday 26 September 2012

Core'dinations & Watercolouring

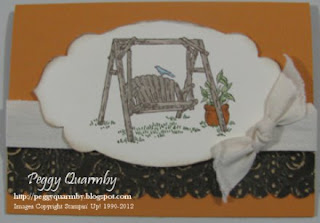
Here's one of the cards we made at the Catty Launch.  We did a bit of watercolouring using markers on the gorgeous Hostess Set Summer Afternoon.  The set is perfect for watercolouring as it has all the markings that show where the light and shadow go for the watercolouring.  We simply used a the lightest shade of a colour ie the Crumb Cake to colour in the swing and then used the darker shade Soft Suede to mark the hightlights.  We also used the new Apothecary Accents Framelits and the new Core'dinations Card.


Project Recipe:
Stamps: Summer Afternoon (Hostess)
Ink:  Early Espresso
Card: More Mustard, Early Espresso Core'dinations Card, Very Vanilla
Big Shot etc: Apothecary Accents, Lacy Brocade Embossing Folder
Punch: Scallop Border
Accesories: Sponge Dauber, Natural Cotton Ribbon, Sanding Block, Markers: Crumb Cake, Soft Suede, More Mustard, Certainly Celery, Gumball Green, Bashful Blue

Tuesday 25 September 2012

Catty Launch Pics

Hiya All,  Wowee it's been a busy few weeks.  I've been burning the candle at both ends with classes, the Catalogue Launch and making 500 Christmas Cards for Fund raising for a local non profit organisation (I'll be posting details and pics soon).  There have been a few midnight or later nights in the last few weeks.   Hence not a lot of blog posting.  So I'll make up for it with a few pics from the Catalogue Launch.

We had a great time trying out the new products and the ladies who attended all got a few little bits from me too.  I made up some Catalogue Survival Kits, which were an idea I got from Debbie Yeomans.  I have since seen them on a few different blogs.  But here's my version...


I used the oh so gorgeous Summer Smooches DSP, and the Apothecary Accents Framelits, the Dotted Scallop Ribbon & Scallop Border Punches to make up these kits.  On the inside is a little ditty that I wrote up, as you'll guess the Highlighted words are items included in the kit, while the words in "Inverted Comma's" are all stamp sets from the Annual & Holiday Catalogues. 


Sorry the picture didn't come out great, I'll keep trying to take a better one.  The ladies that attended also got to pick a Pack of Designer Series Paper with co-ordinating accessories.  As seen below...


Here's how they all look together.


There was a door prize offered of a Sweet Pressed Cookie set or other item to the same value.  I'm happy to say that the winner was Sheila Wright *wave* hi Sheila.  Thanks so much to everyone that came along it was a lot of fun.

I will be back soon with pictures of the projects we made for the Launch.


Sunday 16 September 2012

Masking Magic

Hi All,  I've just had a lovely weekend away at a demo retreat in Denmark.  It was a great weekend, fabulous ladies, loads of yummy food and of course stacks of stamping!  I'll post some photo's of the beautiful creations we made shortly.

The card I'm sharing today is one we made last month as a sympathy card and is featuring masking as the technique.


Project Recipe:
Stamps: Inspired by Nature (retired), Curly Cute
Ink:  So Saffron, Pear Pizzazz, Not Quite Navy
Card: Pear Pizzaz, Not Quite Navy, Very Vanilla
Punches: Lace Ribbon Border
Accessories: Sponge Daubers, Basic Pearls, Stamp-a-ma-jig


Sunday 9 September 2012

Upcoming Classes to Showcase new Products

Hello All, with all the fabulous new products in the Annual Catalogue and Holiday Catalogue just released I am hosting a range of new classes to showcase the gorgeous co-ordinated Stampin' Up! products.  The upcoming classes are as follows:

We have the Catalogue Launch - come along and see the beautiful products in person and make a few projects, receive Catty's, a sample pack of DSP and accessories and go in the draw to win the "Holidays Sweet Pressed Cookes stamps or a stamp set to the same value.  Class fee is $15 and the dates are as follows:

Monday 17th Sept 7pm
Tuesday 18th Sept 7pm
Saturday 22nd Sept 10am

There is also the Sweet Treats class featuring the Black Forrest Cake Gift Box, Sweet Pressed Cookies and more, the class fee is $15 and the dates are:
Monday 24th Sept 7pm
Saturday 28th Sept 10am

Crazy for Christmas class come along and make the ornament from the front of the Holiday Catalogue along with other christmas inspired projects, class fee is $15 and the dates are:
Saturday 20th Oct 10am
Monday 22nd Oct 7pm

For each of these classes the fee includes all products and tools required for the make and takes and a light supper with refreshments.  If you are interested in attending any of these classes please contact me at peggyq@westnet.com.au to book in.


Sunday 2 September 2012

Yippee it's Here

Hi All,   Yay it's finally here, the new Annual Catalogue for 2012-2013 has arrived check it out on my sidebar.  Be prepared to sit with a cuppa for a nice break while you peruse it at your leisure.  Or alternately if you'd like your very own hard copy contact me and I'll get one to you.  Also very exciting is the release of the new Holiday Mini Catalogue, it's jam packed full of gorgeous products for the holidays.

Meanwhile I promised I'd be back with information for my Black Forest Cake Piece, I've had a very bad cold and even had to cancel Stamp Club on Saturday, my sincerest apologies to the ladies.  I hope to see you at my night's this week instead.  I will endeavour to get the details posted this week for the measurements, so sorry for the delay.

Here's a look at the sweet pillow box we made at last month's stamp club. 


Project Recipe:
Stamps: Loving Thoughts
Ink:  Concord Crush (retired)
Card: Whisper White, Blushing Bride (retired)
Big Shot etc: Pillow Box Die
Punches: Modern Label, Triple Layer Doily (retired)
Accessories: Flirtatious Fabric, Multipurpose Adhesive Sheets, Piercing Tool & Mat, Rhinestone Brad (retired)


Sunday 26 August 2012

Heartfelt Weekend...

Hello Stampers,  I have had the best weekend!  I hope yours has been fantastic too, this post will be a bit of a long one so grab a cup of your favourite beverage and settle in for a read. The weekend started off on Friday when I picked up Kate *wave* after work and we made that long 4.5 hour drive up to Perth.  We went up for the Stampin' Up! Heartfelt event on Saturday... destined for loads of fun.  It was so nice to share the drive and the event with Kate and the other ladies from Albany & Katanning (hi Sharon *wave*).

The day was absolutely fantastic, so many wonderful and talented ladies there all to share ideas and our love of stamping, scrap booking and all things Stampin' Up!  The day was a bit nerve wracking for me as I was asked to do a demonstration of something that wowed my customers.  It was such an honour to be given this opportunity, and despite my gratitude and excitement I had a fair bundle of nerves as well.

The whole day was planned around heartfelt handmade projects, cards, gifts wrapping and there was a very strong Christmas theme for the day.  There were share boards for attendees to put samples on, a nice way for everyone to share ideas.  The share boards took the place of making swaps this year, and they were just great.

We also had a product playground manned by some very talented demonstrators sharing ideas on how to use some of our much loved tools like the Big Shot, Brayer, Heat Tool.  Cathy Clark *wave* from Albany manned the Brayer stand and shared some of her samples and expertise.  I'll sure be taking lessons from Cathy because I'm definitely not an expert with the brayer.

We had the make and take area where you guessed it we got to use the Stamp Set from our day pack to make some lovely projects.  We also had the gathering place, a spot to the side for us to stop and have a chat or a much needed snack.  There were also lots of display boards of samples of wonderful projects including a Scrapbook Gallery. 

They also had two demonstration booths set up where 6 demonstrators each took a turn of demonstrating a Wow technique or project/s.  Yep you guessed it this is where I was, I was lucky last on booth 2 and was there from 2.40 - 5.00pm.  My booth buddies were Debbie Yeoman's from Canberra who travelled all the way over to Perth to attend the event, as the dates for the Eastern states events didn't work for her.  Talk about a dedicated and Heartfelt effort not to miss an event. Richelle Fletcher from Perth was my other booth buddy, who kindly lent me some pins to put my projects up on the display boards.  Richelle was a real trooper she was recovering from a cold, but soldiered through and managed to keep her voice throughout her entire presentation.  
My demonstration was on 3D Cake gift boxes, combining two of my loves paper crafting and cooking.  I made a wedge of Black Forest Cake... which actually made me hungry while I was demonstrating it.  What can I say it was afternoon tea time.


Project Recipe:
Card: Early Espresso, Whisper White
Big Shot etc: Embossing Folder & Framelits from the upcoming Holiday Mini & Annual Catalogue, Bigz Scallop Circle
Punches: 3/4" Circle Punch
Accessories: Multipurpose Adhesive Sheets, Sticky Strip, Tombow Glue, Whisper White Organza Ribbon, Cherry Cobbler Seam Binding Ribbon, Mini Glue Dots, Bone Folder, Simply Scored, Piercing Matt

# I will be coming back and posting some dimensions for this project shortly along with a photo of the Rose topped Cupcake Box.

It was such a fantastic day and I came home with lots of new ideas and some old one's revisited and revamped.  I can't wait to get stamping...  A lovely part of the day was getting to play with some of the new products to make a Christmas Ornament and write a "Heartfelt" message and put it on the Christmas Tree... Anyone who made an ornament received a little something from Stampin' Up!. 

A very big thank you to Stampin' Up! for the opportunity to be a part of the day as a presenter and also as an attendee.  There is so much work that goes in behind the scene's to make each event something special.  This one certainly delivered, thank you to Clare, Amanda, Aaron, Bec, Sophie and all the other staff at Stampin' Up! we appreciate the effort you take to give us a wonderful "Heartfelt Event".

Cheers

Sunday 19 August 2012

Retiring Ribbons

Hi All, hope you've had a great weekend.  I sure did I spent the weekend in Katanning with my family for my brothers birthday.  It's so nice when we get the chance to spend some time together and have some fun.  It's sometimes easy to take family for granted and being busy as we all are not take as much time as we should to catch up.  This is something I am working very hard to change, to stop being so focused on the "list" of things to do and be grateful and show appreciation for the wonderful people in my life.  My family, friends, stamping ladies and workmates.... among many others.

Well that's enough of my late night philosophy.  The card I'm sharing tonight is one we made at Stamp Club this month, and features a few products that are retiring.   All of the projects from Stamp Club this month were all featuring at least one retiring product.


This card featured two cool technique's shown at Convention in Canberra this year using threads from frayed Striped Grosgrain Ribbon and how to scrunch ribbon. I'm pretty sure Theresa Dubrowski was the lady who demo'd this technique.  I've misplaced my notebook from Convention.  So if I've got it wrong I am so very sorry and I'll come back and correct my mistake.

Project Recipe:
Stamps: Just Believe
Card: Pear Pizzaz, Rose Red, Early Espresso, Very Vanilla
Big Shot etc: Vintage Wallpaper Embossing Folder
Punches: Scallop Trim Border
Accessories: Rose Red & Pear Pizzaz Markers, Early Espresso Striped Grosgrain, Pear Pizzaz Seam Binding Ribbon, Victoria Crochet Trim Ribbon, Purely Pomegranate Striped Grosgrain (retired)


Friday 10 August 2012

Woopsie My Bad

Hi Everyone, I made a bit of a mistake(woopsie my bad) with the dates of my Catalogue launch.  I've double booked myself for the Saturday15th.  The Catalogue Launch will still go ahead I am just altering the Saturday date so that I can be there... lol.  Hope you'll come along and join in the fun and play with the new products on offer.

Saturday 15th September 10am
Monday 17th September 7pm
Tuesday 18th September 7pm
Saturday 22nd September 10am

The class fee is please RSVP by 10th September by calling me on 9844 8878 or emailing me on peggyq@westnet.com.au .  If class numbers are small I may combine two classes together. 

Tags of Appreciation

Hi All, I thought I'd share with you a sweet little tag I made for a lady at work hi Mim *wave* who asked me to make some tags for the girls in her Netball team.  She is giving each of the girls a gift of appreciation for playing for the season and wanted a little tag to write them a note.  So here's what I came up with...


Hope you all have a fantastic weekend and get some time to create or be inspired.

Project Recipe:
Stamps: Creative Elements
Ink:  Always Artichoke
Card: Very Vanilla, Calypso Coral
Big Shot etc: Two Tags Die, Beautiful Wings Embosslit
Punches: 1/8" Hand Held Punch (retired)
Accessories: Pear Pizazz & Calypso Coral Markers, Sponge Dauber, Old Olive Organza Ribbon (retired), Basic Pearls, Tombow Glue


Thursday 2 August 2012

Catalogue Launch

Hiya All, to celebrate the release of the new catty’s I will be hosting a Catalogue Launch featuring products from both the Annual Catalogue and the Holiday Mini catalogue.  You’ll receive a copy of both Catalogues, plus a sampling of some DSP and other new goodies from the Catalogues.  We’ll also get to play with some of the new goodies and make a couple of projects. Catalogue Launch days are:

Saturday 15th September 10am
Monday 17th September 7pm
Tuesday 18th September 7pm.

The class fee is please RSVP by 10th September by calling me on 9844 8878 or emailing me on peggyq@westnet.com.au .  If class numbers are small I may combine two classes together. 
 
Keep an eye out on my blog for sneek peeks of the projects we will be making at the launch...
 

Blast from the Past

Hi All, I'm back again with the card post I promised.  This card was made quite a while ago almost a year in fact for my brother's birthday.  I was going through my pictures recently and saw this card and thought it would be a nice one to share.  Quite often when I'm making a card I'll use a theme or colour combo that's specific to that person.  In this case my brother loves soccer so I used that as a starting off point in my creative process.  I decided to make it an easel card so that it had that cool 3D effect, check it out below.


Project Recipe:
Stamps: Lovely as a Tree
Ink:  So Saffron, Wild Wasabi, Bashful Blue
Card: Wild Wasabi, Whisper White, So Saffron
Punches: 1 3/4 Scallop Circle, Modern Label, Word Window, Cupcake Builder
Accessories: Sponge Dauber, Dimensional, Paper Snips, Lolly Pop sticks, White Thread, Tombow Glue


It's time to Retire

Hiya everyone,  it's time to bid a fond farewell to some of our much loved stamp sets and activities.  As we pave the was for the new and exciting goodies coming in the Annual Catalogue and Holiday Mini making their debut 1st September. 

There are just a few items that are retiring to see the list of Stamp Sets retiring please click here and to see the list of Accessories that are retiring please click here.  All products on the retiring lists are available while stocks last so if there is something you have fallen in love that's retiring please contact me.  I will be back shortly with a card to share.

Wednesday 25 July 2012

Christmas Gift Box

Hello Everyone, hope your week is going along nicely.  Here is a sweet little gift box and some tea light candles we made at the Christmas in July class I held earlier this week.  The tea light candles are in a plastic holder instead of the usual aluminium which works nicely when you use the coloured candles.  The white candles are citronella scented and the red candles are strawberry, they smell great.  This is a nice but practical little gift.


Project Recipe:
Stamps: Beautiful Season
Ink:  Lucky Limeade
Card: Pear Pizzazz, Whisper White, Twitterpated DSP, Silver Glimmer Card
Big Shot etc: Gift Box #2
Punches: Curly Label, Eyelet Border
Accessories: Pear Pizzazz, Cherry Cobbler Markers, Cherry Cobbler, Dotted Scallop Ribbon, Adhesive, Dimensionals