Showing posts with label Theme Masculine. Show all posts

Wednesday, 16 August 2017

Masculine Wood Birthday

Hi All
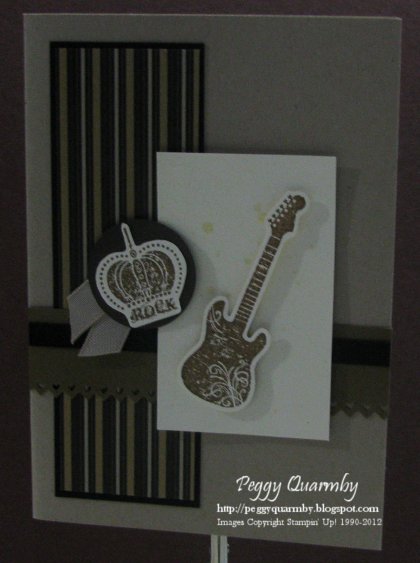
           Here's a quick and easy masculine birthday card we made at a class recently.  If you're like me sometimes you struggle when it comes to making masculine cards, especially with not putting ribbon or other embellishments on that have a feminine bent. I absolutely love the Happy Birthday Thinlits it was on my must-have list when I saw the Annual Catalogue.  Such lovely scripted writing and a nice big focal point to put on a card or 3D item.  

As a quick tip you might notice the Rhinestone's on the strip of Basic Black card aren't in the catalogue.  To colour them simply purchase a pack of Metallic Sharpies and colour them while on the backing sheet and then transfer them to your project.  This works with regular Sharpie markers too, not just the metallic ones.


Stamp Sets: Shock and Horror no stamps were used making this card...
Card:  Crumb Cake, Basic Black, Wood Textures Paper Stack
Big Shot: Happy Birthday Thinlits
Accessories: Rhinestone Basic Jewels, Metallic Sharpie Marker, Tear Tape Adhesive, Tombow Multipurpose Glue, Dimensionsals

I hope you enjoyed this creation, I think I'll make this design again using a different designer series paper in a pack of co-ordinated cards.  It would make a nice gift.  If  you liked any of the products shown here you can contact me to order or alternately visit my online store.


Saturday, 5 August 2017

Shining Light

Hello
         Here's a little light to bring to your day.  I like lighthouse stamp sets, in fact I think I've bought everyone Stampin' Up! has released since I became a demonstrator.  Maybe it's because I live in a seaside town or maybe it's because they are very versatile.  I hope you enjoy checking out this project as much as I enjoyed making it.

I started by stamping the sand dune image from the High Tide Stamp Set using Crumb Cake ink on the Very Vanilla card layer. Then I stamped the base lighthouse image from High Tide in Night of Navy ink by lining it up with the indent in the dune.  Then I stamped the top image of the lighthouse in Night of Navy Ink layering it carefully over the base lighthouse image.  Then I stamped the bird image from High Tide in Marina Mist angling them up to the right hand corner.  I punched the top right and bottom left corners with a corner rounder punch (now retired).  I stamped the sentiment in Marina Mist on a small layer of Very Vanilla Card and then adhered to a piece of Burlap Ribbon and popped up on dimensionals.


Stamp Set: High Tide
Ink: Night of Navy, Marina Mist, Crumb Cake
Card: Marina Mist, Very Vanilla
Punches: Corner Rounder (retired)
Accessories: Burlap Ribbon, Tear Tape Adhesive, Dimensionals

If you like any of these products you can purchase them through me or on my Online Store.


Saturday, 29 July 2017

Birthday Balloons

Hello All
               This is a card I made earlier on this year for my Dad's birthday.  Like many of you I sometimes struggle with masculine cards.  I love this colour combination and am very happy with how it turned out.

I started out with quite a bit of sponging to soften the edges of the card stock.  The Crumb Cake card base and Very Vanilla layer where sponged with Crumb Cake ink.  The Night of Navy layer was run through the big shot and the Dynamic Hexagons Textured Embossing Folder and then sponged with Night of Navy.  The Cherry Cobbler layer was punched with the Triple Banner Punch and then sponged with Cherry Cobbler.

I stamped the smaller balloon in Cherry Cobbler ink on Very Vanilla card first and then stamped the clouds in Night of Navy.  Then I stamped the larger balloon in Crumb Cake ink on a piece of Very Vanilla and then die cut with Up & Away Thinlits.  The birthday sentiment was stamped using Night of Navy and the Stamp-a-ma-jig.


Stamps: Lift Me Up
Inks: Night of Navy, Cherry Cobbler, Crumb Cake
Card: Night of Navy, Cherry Cobbler, Crumb Cake, Very Vanilla
Punches: Triple Banner
Big Shot: Up & Away Thinlits, Hexagons Dynamic Embossing Folder
Accessories: Sponge Daubers, Stamp-a-ma-jig, Tear Tape Adhesive, Dimensionals

Like what you see, you can purchase any of these products at my Online Store


Sunday, 21 August 2016

Day 21 Thoughtful Branches

Hello All
               Wow, what a long week it has been, so glad it's Sunday and I can chill out a bit today.  I hope you too get some chill time, be that on your own, with family or with friends.  Today's card is a Father's Day card and one that started off with an idea that popped in my head a little while ago.  The idea was to use some Pop of Pink Washi Tape the Gold sprinkles on Black and apply to Basic Black card stock and then cut out using the tree image from Beautiful Branches.  I so wanted to see that pop of gold on black and I must admit I'm very happy with how this idea turned out.


Stamp Set: Teeny Tiny Sentiments
Ink: Basic Black Archival
Card: Basic Black, Very Vanilla, Gold Glimmer Paper
Big Shot: Beautiful Branches, Softly Falling EF, Die Brush
Punch: Triple Banner
Accessories: Pop of Pink Washi Tape, Black Linen Thread (retired but you could use Basic Black Solid Twine), Two Way Glue, Adhesive Tape, Dimensionals

Cheers Peggy


Tuesday, 2 August 2016

Day 2 Thoughtful Branches

Hiya All
              Here's a card that the ladies attending my stamp club this week are doing.  It's a clean and simple design with an unusual color combo for me.  I hope you like it, I wanted to try something other than my usual blues, brownes or autumn tones.  Fathers day is coming up next month and I thought I'd be a little organised and get some ideas together early.  Gosh I just love the little birds in this stamp set and the co-ordinating thinlit - no fussy cutting here.


Stamp Set: Thoughtful Branches, Thoughtful Banners
Inks: Basic Black Archival, Basic Grey Archival, Sahara Sand
Card: Basic Grey, Whisper White, Sahara Sand, Pop of Pink DSP
Punches: Project Life Corner Rounder, Duet Banner
Big Shot: Beautiful Branches Thinlits, Magnetic Platform, Die Brush
Accessories: Tear Tape Adhesive, Dimensionals, Two Way Glue Pen (retired) you could also use the Fine Tip Glue Pen

Cheers & Happy Stamping

Monday, 1 August 2016

Thoughtful Branches Begins

Hiya Everyone,
                         Long time no post... yes I've been absent again the main reason being a rather large renovation going on that meant no phone or internet connection.  Unfortunately I'm not tech savy enough to do blog posts from my phone.  But the renovations are completed and yay look fabulous.  So I now have time to create and get back to blogging. 

My goal this month is to post each and every day of August featuring a project using the Thoughtful Branches Stamp Set or Beautiful Branches Thinlits.  Both of these are a limited release promotion offered by Stampin' Up from 2nd-31st August or while stocks last.  I am very much in love with them and look forward to sharing some inspiration with you.  I look forward to sharing my creations focusing on this set with you. 

So here's my first card which could be used for many occasions.  To give the tree a dense foliage I have stamped the leaves twice once in Always Artichoke and a second time in Pear Pizzaz rotating the stamp slightly.


Stamp Set: Thoughtful Branches, Thoughts & Prayers
Ink: Early Espresso, Delightful Dijon, Always Artichoke, Pear Pizzaz
Card: Delightful Dijon, Early Espresso, Very Vanilla
Accessories: Moroccan Washi Tape, Linen Thread, Dimensionals, Tear Tape Adhesive

Cheers Peggy

Thursday, 10 March 2016

Birthday Skies

Hey All
             This card is one I designed for my Dad for his birthday earlier this year.  Like a lot of stampers I sometimes find designing a masculine card a little more challenging.  For Dad's card I used my new favourite Sale-a-Bration stamp set Sky is the Limit and the wonderful Going Places Designer Series Paper Stack.  I also used some retired Stampin' Up! products that I had in my craft room.


Project Recipe:
Stamps: Sky is the Limit
Ink:  Lost Lagoon, Basic Black Archival Ink
Card: Lost Lagoon, Whisper White, Basic Black, Going Places Designer Series Paper Stack
Big Shot etc: Cloudy Day Embossing Folder (retired)
Punches: 21/2" Circle Punch
Accessories: Basic Grey Striped Satin Ribbon, Sponge Daubers, Paper Snips, Tear Tape Adhesive, Dimensionals


Happy stamping and inky fingers


Thursday, 28 January 2016

Sky is the Limit

I really like the "Sky is the Limit" Sale-A-Bration Stamp Set, as soon as I saw it in the catty I knew I had to have it.  I like the font for the greetings and the airplane image is so versatile.  I have seen lots of beautiful cards made with this set and am seeing lots of brown and blue colour combinations.  I decided I wanted to try something a little different.  So I used a combination of Elegant Eggplant, Smoky Slate and Basic Grey balanced with some Whisper White.


Stamps: Sky is the Limit (SAB), Timeless Textures
Inks: Smoky Slate, Basic Grey, Elegant Eggplant
Card Whisper White, Smoky Slate, Elegant Eggplant
Big Shot: Stylish Stripes Embossing Folder
Accessories: White Jut Ribbon 1 1/4", Sponge Daubers, Paper Snips, Stamp-a-ma-jig, Adhesive, Dimensionals
 
Cheers & Happy Stamping


Saturday, 23 January 2016

Back into Blogging

Hi All, sorry for the long hiatus lets just say that life - and a cute little dog got in the way of blogging the last few years.  The plan is to get back into the swing of blogging and sharing some of my creations and providing a little bit of inspiration. 

This card is one we recently made at our monthly Stamp Club.  It is my nod to Valentines Day this year, and more along the lines of "sharing the love" with anyone who matters rather than specifically romantic love.


Stamps: Going Global, Enjoy the Little Things
Inks: Sahara Sand, Archival Basic Black
Card: Sahara Sand, Whisper White, Basic Black, Going Places Designer Paper Stack
Punches: Washi Tape, 2" Circle, 1" Circle
Big Shot: World Traveler Embossing Folder
Accessories: Sahara Sand Lace Trim, Adhesive, Dimensionals

Cheers and Happy Stamping

Thursday, 2 August 2012

Blast from the Past

Hi All, I'm back again with the card post I promised.  This card was made quite a while ago almost a year in fact for my brother's birthday.  I was going through my pictures recently and saw this card and thought it would be a nice one to share.  Quite often when I'm making a card I'll use a theme or colour combo that's specific to that person.  In this case my brother loves soccer so I used that as a starting off point in my creative process.  I decided to make it an easel card so that it had that cool 3D effect, check it out below.


Project Recipe:
Stamps: Lovely as a Tree
Ink:  So Saffron, Wild Wasabi, Bashful Blue
Card: Wild Wasabi, Whisper White, So Saffron
Punches: 1 3/4 Scallop Circle, Modern Label, Word Window, Cupcake Builder
Accessories: Sponge Dauber, Dimensional, Paper Snips, Lolly Pop sticks, White Thread, Tombow Glue


Wednesday, 4 July 2012

Mocha Grunge Rock

Hiya Everyone, hasn't the weather been gorgeous lately.  So much sunshine it's very nice to see especially when it's still a bit chilly out.  Definitely no cause to complain about the weather here lately.  During the week has been overcast and miserable and the weekends glorious... looks like this week is the turnabout a glorious week and they are predicting rain and chilly weather for the weekend.  A good excuse to stay in and cook, stamp or while away the time with a bit of company or a good book.

Today's card was one I made a bit ago, we made this card for Stamp Club last month and it was also one of my swaps for convention.  Every convention I try to make at least one masculine inspired card.  This year my Mocha Morning/Grunge Rock combination was the one.


I so love our DSP and Specialty DSP in the current catalogues they make projects look so great and make colour co-ordination so easy.  Sorry that the photo is a bit dark I couldn't seem to get the angle right no matter how I tried it... woopsie.  You can see what looks like little smudges on the Very Vanilla panel behind the guitar it's actually Gold Glow Smooch Spritz.

Project Recipe:
Stamps: Grunge Rock
Ink:  Soft Suede
CardCrumb Cake, Soft Suede, Very Vanilla, Basic Black, Mocha Morning Specialty DSP
Punches: Pinking Hearts Border Punch, 1 ¼” Circle Punch
Accessories: Gold Glow Smooch Spritz, Crumb Cake Taffeta, Dimensionals, Paper Snips, Adhesive

Enjoy the rest of the week and especially the weekend, make the most of the sunshine while you can.


Saturday, 3 March 2012

Sneak Peak 2

Hope your long weekend is off to a good start.  There's really nothing like a Saturday is there, that bright sunny feeling knowing that you don't have to work... we'll if your lucky to be a Monday-Friday person like me.  So to all you people working on a Saturday hope time flies by and you have a good day.

Here is sneak peak 2 for the projects we will be making at Stamp Club in March.  This card is the third card in a set of Spice Card DSP and Zoo Review inspired cards we've been making at Stamp Club since January.  I just love the Zoo Review Stamp Set it's just so versatile and can be used for everyone women, men and children.  Last month was "Leo the Lion" and January was the Giraffe with a Happy Birthday Card.  So here is the "So Many Smiles Zebra".


For the layout of "So Many Smiles Zebra" I used a sketch from Mojo Monday 227.  I wasn't in time to participate in the sketch challenge but if you'd like a look here is the site Mojo Monday 227

Project Recipe:
Stamps: Zoo Review, Pettite Pairs
Ink:  Early Espresso
Card: Pear Pizzaz, Early Espresso, Very Vanilla, Spice Cake DSP
Big Shot etc: Ovals Die, Vintage Wallpaper Embossing Folder
Punches: Scallop Border
Accessories: Very Vanilla Satin Ribbon, Bakers Twine, Stamp-a-ma-jig, Subtles Glimmer Brads, Paper Snips, Dimensionals


Monday, 27 February 2012

Nautical Journey Class

I can't believe how fast time flies, it's almost the end of February.  There were so many wonderful things I wanted to do with the products from the Summer Mini Catalogue, and I have done quite a few of them... But one in particular I haven't done yet.  A class with a masculine feel to the projects using the Nautical Expedition Suite of products.  Well I finally managed to put the last of the projects together and here they are:


You may recognise the Happy Birthday card, as it's one I posted not so long ago for a sketch challenge.


 The box is a CASE from Melissa of Bee Devine Designs you will need to scroll down her blog to see the original Scallop Square box she created.


The last card I felt was for giving someone the world... you'll see what I mean.


The class will be held on:   
Saturday March 24th 10am,              Monday March 26th 7pm

The Class Fee is $10 and includes all products and light refreshment. Please RSVP 3 days prior to class date, I will take late RSVP's but only if space allows. 

Cheers and Happy Stamping

Wednesday, 22 February 2012

Stamp Club February

Earlier this week I started to showed you the Lion Easel Card we made at February's Stamp Club.  There were two more cards we made in February.  The first was our technique card for this card we used the Baby Wipe Swipe Technique to create our over the water sunset.  It's a great technique for backgrounds and is pretty easy although you may need a little bit of practice I did.


When I stamped my image I used the stamp-a-ma-jig and stamped the ship twice in the same place to give me the depth of colour so that I could see the ship easily over the sea that was also Not Quite Navy.  Simply set up your stamp-a-ma-jig and stamp the image using the guide and then reink the stamp and stamp again without moving the guide.

Project Recipe:
Stamps: The Open Sea, You Are Loved
Ink:  Baja Breeze, Not Quite Navy
Card: Baja Breeze, Not Quite Navy, Pumpkin Pie, Glossy White Card Stock
Big Shot etc: Top Note Die
Punches: Dotted Scallop Ribbon Border, Owl Builder Punch
Accessories: Stamp-a-ma-jig, White Bakers Twine, Pumpkin Pie Brads, Pumpkin Pie, Baja Breeze and Not Quite Navy Re-inkers, Piercing Tool and Matt Pack

The third and last card we made was part of our monthly challenge.  This months challenge was to do a girls card for a girl up to 7 years old.  I've used very girly colours and the gorgeous Flirtatious Specialty Paper to make the card especially girlish.  You could use this card for an older girl as well, it's just so pretty and cute.  Have a look and see what you think...


Now in class I gave the ladies the option to bling up the little flowers using the Silver Glimmer Paper from the Summer Mini.  This way you can give your special girl diamonds or pearls... what girl doesn't love a bit of bling.  My card shows the pearl option but both look equally lovely.

Project Recipe:
Stamps: Create a Cupcake, Curly Cute
Ink:  Melon Mambo, Pretty In Pink, Wisteria Wonder
Card: Melon Mambo, Wisteria Wonder, Whisper White, Flirtatious Specialty Paper
Punches: Eyelet Border Punch, Cupcake Builder, Itty Bitty Shapes
Accessories: Basic Pearls, Piercing Tool (to pick up pearls), Concord Crush Stitched Poly Ribbon, Dimensionals


Monday, 20 February 2012

Monday Mojo

Hi All, hope you've all got a bit of Monday mojo like me today.  Usually Monday's are my least favourite day of the week, it's a bit hard to let go of the weekend and get back into the swing of the working week.  But I've changed my mind this evening as my mojo is going strong tonight.  I've designed a new card for an upcoming class/workshop I'm holding using the Nautical Expression DSP and The Open Sea stamp set from the Summer Mini... I will post more details and some photo's soon.

However tonight I'll show you one of the cards we made at last month's stamp club.  This stamp club was so much fun, they all are but this one seemed extra fun as we added a musical element to go with the first card as shown below...


As you can see it's an easel card, these cards are so much fun to make.  I can't believe I waited so long to make one, I mistakenly thought they were tricky.  As you can see we feature the Spice Cake DSP and have used a co-ordinating ink colour for the main image and sentiment. 

The Lion from Zoo Review was our inspiration for our musical addition, everytime I see this lion I can't help but sing "The Lion Sleeps Tonight" or the Wimoweh song by Solomon Linda.  I also keep humming "Leo the lion is the king of the jungle".  Some of the ladies said it reminded them of Kimba the White lion, so I googled it in class and had a YouTube of the theme song playing while we stamped... it was so enjoyable and a lovely evening.

Project Recipe:
Stamps: Zoo Review, Teeny Tiny Sentiments
Ink:  More Mustard
Card: Early Espresso, Whisper White, More Mustard, Spice Cake DSP
Big Shot etc: Scallop Circles #2, Circles #2 Dies, Perfect Polka Dots Embossing Folder
Punches: Word Window, Modern Label
Accessories: Dimensionals


Tuesday, 7 February 2012

A Quick Card

Oh what a week and it's only Tuesday...  Just a few little drama's this week as you can probably guess.  They are putting in footpath in front of my house which is a great thing.  But wouldn't you know it I get home yesterday and cannot get in my driveway, they blocked it off with the framework for the concreting to go in.  I had to go round the block and through my neighbours driveway and across the verge to get in my drive.  Needless to say not a great way to end Monday afternoon.  Even worse was the timing I had ladies coming for Monday night stamp club all expecting to be able to park on my lawn or in my drive... woopsie.  Thanks to my ladies last night and tonight for being so wonderful and understanding.  I still can't drive on it today but all should be good for tomorrow.  But enough of the drama and on with the cards... 

While I was waiting for my ladies to arrive last night I had a quick look at some of the blogs I visit and one was the Sweet Sunday Sketch Blog.  Yep you guessed it I found another sketch to use... so here's the card I mostly whipped up before class, with a little sponging and adhering during class wink.


The Sketch Challenge is number SSSC151 which you can check out here Sweet Sunday Sketch Challenge 151.  I might even have done this one in time to participate in the challenge, yay.

Project Recipe:
Stamps: The Open Sea, Teeny Tiny Sentiments
Ink:  Not Quite Navy, Crumb Cake
Card: Not Quite Navy, Very Vanilla, Nautical Expressions DSP
Big Shot etc: Circles #2 Die
Punches: 1 3/8" Circle, Spiral Tab Punch (retired)
Accessories: Sponge Dauber, Dimensionals

Monday, 30 January 2012

Birthday's Galore

Happy Birthday Mum!  Yep you guessed it today is my Mum's Birthday!  Here's hoping she had a very wonderful day.  Because we live 170km away from each other I went up to celebrate her birthday with her over the weekend.  We had a lovely dinner out with the family Friday night at our favourite Chinese Restaurant, yummo!!!  I rang early this morning to wish her a happy birthday and after talking with her this afternoon she had a lovely day.

My Dad's Birthday is also in January and was a week ago... so this post is actually for Dad's Birthday card not Mum's.  But because I wasn't going home until this last weekend... um... I didn't make it until last Thursday five days after Dad's Birthday.  Which is why I didn't put the pictures up earlier... yep bad girl I know.  Just in case your starting to snooze off now with all my mindless chatter here is the card.


Woopsie sorry the picture is a little dark, but you can see it pretty well.  I'm not so great with the camera, hopefully I'll improve as we go.

Project Recipe:
Stamps: The Open Sea, Party This Way
Ink Early Espresso
Card: Early Espresso, Very Vanilla, Nautical Expedition DSP
Big Shot etc: Perfect Polka Dots Embossing Folder, Perfect Pennants Bigz L Die, Circles #2 Die
Accessories:  Sponge Dauber, Stamp-a-ma-jig, Early Espresso Dotted Scallop Ribbon, Dimensionals

I love to use sketches to help keep my card layouts interesting.  So for Dad's Birthday Card I used this sketch from the Sweet Sunday Sketch Challenge 150.  I was too late to actually link my card into the gallery there.  But to see the Sketch directly from the blog click this link Sweet Sunday Sketch Challenge 150 simply scroll down the page it is the second post.
Cheers

Wednesday, 18 January 2012

Rose Red Candy Wrapper

Here it is, as promised the next projects from January Stamp Club.  As you probably noticed I've used the You are Loved Stamp Set from the Summer Mini Catalogue on two of the January projects.  I wanted to have a little bit of Valentine's day inspiration... it's not till February but it's never too early to start creating for that special someone in our lives.  I did keep both projects a little bit neutral in the wording so that they could easily be used to give to a friend or loved one as well as a valentine.

Project two was the Rose Red Candy Wrapper, isn't it sweet.  When I first saw it I thought when would I use it outside of Christmas... anytime you need a cute box really!!! Perfect as place settings at a children's party or a dinner party... with a little something inside.  The trick with the Candy Wrapper die is to make sure your score lines are folded very well and crisply, using a bone folder is a must.


Project Recipe:Stamps: You are Loved
Ink: Rose Red, Pretty In Pink, Old Olive Re-Inkers,
Card: Rose Red, Whisper White
Big Shot etc: Candy Wrapper Die
Punches: Decorative Label
Accessories: Lucky Limeade Ruffled Ribbon, Baby Wipes, Paper Snips, Bone Folder

After two Pink toned projects I thought it might be nice to completely change the colour scheme.  A bit of Spice Cake, Soft Suede, Early Espresso and More Mustard and voila a more masculine colour scheme...  Here's the "Spice Cake Giraffe" as I've nicknamed him. 


Project Recipe:Stamps: Zoo Review, Curly Cute, French Foliage
Ink: Soft Suede, More Mustard
Card: Soft Suede, Early Espresso, Very Vanilla, Spice Cake DSP
Punches: Dotted Scallop Ribbon Border
Accessories: Sponge Daubers, Stamp-a-ma-jig

I love the colour combination of this card, in fact this card is modelled after a Swap Card I did for Perth Regionals 2011.  There was a lot of stamping off/generational stamping to make the background effect around the giraffe. 

Cheers