Wednesday 30 August 2017

Floral Birthday

Hello All,
                Here's a quick and easy birthday card we made in class recently.  I find it a challenge sometimes to keep cards simple but this one came together so easily I loved it.  That's my aim at the moment to make simpler cards, not that I don't love layers but sometimes it's nice to "keep it simple".

I stamped the floral image from the Wood Words Stamp set on the front of the Whisper White Card in Lemon Lime Twist.  I found when trying to stamp a larger odd shaped image as a background it's easier to start in the middle of the card and work my way out.  It's also nice to leave a few patches of white.

I embossed the layer of Lemon Lime Twist using the Petal Burst Embossing Folder this helps to add texture and depth to the card.  I stamped the Birthday Sentiment from Happy Birthday Gorgeous onto a scrap of Whisper White and then punched out with the Pretty Label Punch and popped on some dimensionals and lastly I added some Rhinestones for a bit of bling.


Stamp Sets: Wood Words, Happy Birthday Gorgeous
Ink: Lemon Lime Twist
Card: Whisper White, Lemon Lime Twist
Punch: Pretty Label
Big Shot: Petal Burst EF
Accessories: Rhinestone Basic Jewels, Tear Tape Adhesive, Dimensionals

# Please note the Wood Words Stamp Set is available as a Bundle with the Wood Crate Framelit Dies.  Also the Happy Birthday Gorgeous Stamp Set is available as a Bundle with the Happy Birthday Thinlits Dies.  When products are purchased in a Bundle they are discounted by 10%.

Contact me if you'd like any of the above products and would like to purchase them.  They are also available at My Online Store.


Saturday 26 August 2017

Bright Bee's

Hi Ho Everyone,
                           Like most of you I'm looking forward to the arrival of spring.  The warming weather the chirping birds, blooming flowers and increasing amounts of sunshine.  Thinking of sunshine brings me to the bright and cheerful card I'm sharing with you today.  I made this card a while ago but the bright and cheerful Daffodil Delight and cute bee's just called to me to share them.

For this card I embossed a card layer using the Hexagons Dynamic Textured Embossing Folder. This card layer is just a little smaller than the card base.  I stamped the sentiment on a piece of Whisper White and then cut it down using the Triple Banner punch.

The Bee's are stamped individually on Whisper White in Basic Black Archival Ink and then the Daffodil Delight wings and body are Two-Step Stamped over the Line Image of the Bees.  I fussy cut out each of the Bee's and then coloured over the wings using Clear Wink of Stella.  I had three bee's as I didn't want them do be symmetrical so I layered them in a basic triangular shape.

Stamps: Dragonfly Dreams p138
Ink: Basic Black Archival 185, Daffodil Delight p186
Card: Daffodil Delight p186, Whisper White p185
Punch: Triple Banner p206
Big Shot: Hexagons Dynamic Textured EF p211
Accessories: Tear Tape Adhesive p 202, Dimensionals p203, Clear Wink of Stella p200

If you like any of these products you can purchase them by contacting me or through my Online Store

Wednesday 23 August 2017

Hello Friend

Hi All
          I have a wonderful friend who regularly mails cards out to family and friends, some just to say hi, some to help perk them up if they are having a hard time.  It's such a wonderful expression of caring to write and send that card in the mail and to know the person on the other end will get a nice surprise and a bit of joy when they open the mail.

I made this card as a bit of homage to that process and also to remind me to send a card just because rather than just for big occasions.  So here's to you my friend... you know who you are :O).  For this card I used the Lovely Inside & Out Stamp Set it's such a fun set with it's bold words and shapes. This stamp set also co-ordinates with the Lovely Words Thinlits which are just gorgeous.  When purchased as a bundle you can save 10% and know you will get lots of use out of both as they co-ordinate so well together.

I stamped the Fresh Fig circle image first as a background, the trick with any background is to stamp your images in a triangle - this helps balance things out.  Then I cleaned the circle stamp and stamped it again in Sweet Sugarplum.  Lastly I stamped the Smoky Slate droplet image randomly over the background.  I stamped the word Friend in Sweet Sugarplum first and then stamped the Hello in Fresh Fig so I could line it up as I liked.  Then I punched the layer with the Triple Banner punch and tied a bow with the Whisper White Bakers twine and layered it all together.


Stamp Set: Lovely Inside & Out, Thoughtful Banners
Inks: Fresh Fig, Sweet Sugarplum, Smoky Slate
Card: Fresh Fig, Sweet Sugarplum, Smoky Slate, Whisper White
Punches: Triple Banner
Accessories: Whisper White Bakers Twine, Dimensionals, Tear Tape Adhesive

Stampin' Up! have released some new products into the Clearance Rack once again so check it out at  My Online Store along with any of the products you may like from the above project.

Saturday 19 August 2017

Elegant Dragonfly

Hello Everyone,
                          Thought I'd share another Birthday card with you, using the elegant dragonfly image from the Dragonfly Dreams Stamp Set.  Of course to make it simple I cut the image our using the co-ordinated Dragonfly Details Thinlits, I just love how Stampin' Up! makes crafting so easy by co-ordinating these products for us.  It really makes things simple and to be honest I don't always love to fussy cut.  For the lovely dotted background I used the dotted image from the same stamp set and stamped it in Pear Pizzaz and Marina Mist.  It's hard to tell from the photo but the wing of the dragonfly have been coloured with Clear Wink of Stella Glitter Brush.


Stamp Sets: Dragonfly Dreams, Birthday Blosssoms
Inks: Pear Pizzaz, Marina Mist, Dapper Denim
Card: Pear Pizzaz, Dapper Denim, Whisper White
Big Shot: Detailed Dragonfly Thinlits
Accessories: Clear Wink of Stella Glitter Brush, Stamp-a-ma-jig, Adhesive, Dimensionals

Happy stamping, if you would like to purchase any of these items contact me or buy them at my online store.
           

Wednesday 16 August 2017

Masculine Wood Birthday

Hi All
           Here's a quick and easy masculine birthday card we made at a class recently.  If you're like me sometimes you struggle when it comes to making masculine cards, especially with not putting ribbon or other embellishments on that have a feminine bent. I absolutely love the Happy Birthday Thinlits it was on my must-have list when I saw the Annual Catalogue.  Such lovely scripted writing and a nice big focal point to put on a card or 3D item.  

As a quick tip you might notice the Rhinestone's on the strip of Basic Black card aren't in the catalogue.  To colour them simply purchase a pack of Metallic Sharpies and colour them while on the backing sheet and then transfer them to your project.  This works with regular Sharpie markers too, not just the metallic ones.


Stamp Sets: Shock and Horror no stamps were used making this card...
Card:  Crumb Cake, Basic Black, Wood Textures Paper Stack
Big Shot: Happy Birthday Thinlits
Accessories: Rhinestone Basic Jewels, Metallic Sharpie Marker, Tear Tape Adhesive, Tombow Multipurpose Glue, Dimensionsals

I hope you enjoyed this creation, I think I'll make this design again using a different designer series paper in a pack of co-ordinated cards.  It would make a nice gift.  If  you liked any of the products shown here you can contact me to order or alternately visit my online store.


Saturday 12 August 2017

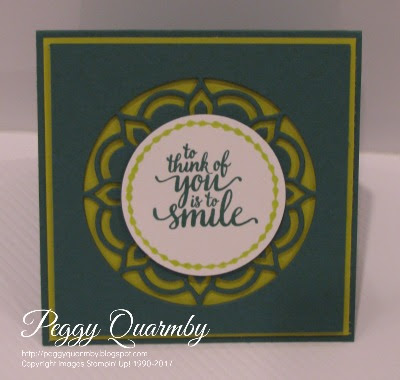
Medallions Make Me Smile

Hello All
               I don't know about you but I am drawn to medallion shapes, I just love the intricate designs and the circular shape.  I wanted to make the focus of this card on the sentiment and the medallion behind.  So to embrace the symmetry I made it a square card so it would all balance.

I centred the medallion in the middle of the Tranquil Tide card stock layer and then ran it through my Big Shot.  I adhered the Tranquil Tide to the Lemon Lime Twist card layer and then onto the card base.  I stamped the circular border image in Lemon Lime Twist onto Whisper White and then stamped the sentiment in Tranquil Tide in the centre.  I then punched the images out using the 2" Circle Punch and adhered to the card with dimensionals.  You could easily add some Basic Pearl or Rhinestone Jewels to this card to add a bit of bling.

A handy tip when stamping with photopolymer stamps place a Stampin' Matt underneath your card layer this will give you a nice clear image stamped.  Because of the nature of photopolymer stamps they don't have the cushioning layer that clear mount and wood mount stamps do.  So the Stampin' Matt provides the cushion.


Stamp Set: Eastern Beauty 
Ink: Tranquil Tide, Lemon Lime Twist
Card: Tranquil Tide, Lemon Lime Twist, Whisper White
Big Shot: Eastern Medallion Thinlits
Punches: 2" Circle
Accessories: Tear Tape Adhesive, Dimensionals, Stampin' Matt

Products Available in a Bundle at 10% Discount
Eastern Beauty Stamp Set is available as a Bundle with Eastern Medallion Thinlits

If you liked this project any of the products can be purchased through me directly or via my Online Store.


Wednesday 9 August 2017

Thanks a Bunch

Hi All
          Here's a sweet card I made as a thank you card recently for customers placing an order with me.  One of the things I love most about Stampin' Up! is how all their products lines co-ordinate with one another.  The stamps and dies or punches, the colours and designer paper and accessories.  It makes creating cards and 3D project so easy and fun!

For this card I wanted to use the Circle Die Cut as the focal point.  I die cut the circle from Whisper White Card Stock using the Layering Circles Die.  Then I stamped the flower image from Oh So Eclectic using Peekaboo Peach and Pumpkin Pie using the Rock'n'Roll technique.  Then I stamped the Thanks sentiment from Beautiful Bouquet in Emerald Envy.  I layered a piece of Naturally Eclectic Designer Series Paper onto a layer of Emerald Envy card onto Peekaboo Peach card base.  I cut a piece of Peekaboo Peach Ruffled Ribbon (retired) and folded over and adhered to the back of the Circle die.


Stamp Sets: Oh So Eclectic, Beautiful Bouquet
Ink: Peekaboo Peach, Pumpkin Pie, Emerald Envy
Card: Peekaboo Peach, Emerald Envy, Whisper White, Naturally Eclectic DSP
Big Shot: Layering Circles Dies
Accessories: Peekaboo Peach Ruffled Ribbon (Retired), Tear Tape Adhesive, Dimensionals

# Products Available as a Bundle at 10% Discount
Oh So Eclectic and Eclectic Layers Framelits
Beautiful Bouquet Stamp Set and Bouquet Bunch Framelits

You can purchase any of these products directly through me or on my Online Store.

Happy Stamping, hope you have an inky day!   

Sunday 6 August 2017

Carols of Christmas - Early Release

Hi All,
           Now I know it's a little early to start talking of Christmas.  But for us crafters getting the Christmas Card Stash started early is the only way to avoid excess Christmas Craziness.  To help us out Stampin' Up! have released a new Bundle Carols of Christmas early - ahead of the Holiday Catalogue that's coming out 1st September (psst contact me if you'd like a copy).

This Bundle is made up of a Stamp Set with traditional Christmas images and a set of co-ordinating Thinlits, if purchased together in a Bundle they are discounted by 10%.  However you can still purchase them individually.  Here's a card sample made by Stampin' Up! so I haven't provided the project recipe this time.


For more images of the stamps and dies and promotion details see below.


If you like any of these products you can purchase them from me directly or through my Online Store

Saturday 5 August 2017

Shining Light

Hello
         Here's a little light to bring to your day.  I like lighthouse stamp sets, in fact I think I've bought everyone Stampin' Up! has released since I became a demonstrator.  Maybe it's because I live in a seaside town or maybe it's because they are very versatile.  I hope you enjoy checking out this project as much as I enjoyed making it.

I started by stamping the sand dune image from the High Tide Stamp Set using Crumb Cake ink on the Very Vanilla card layer. Then I stamped the base lighthouse image from High Tide in Night of Navy ink by lining it up with the indent in the dune.  Then I stamped the top image of the lighthouse in Night of Navy Ink layering it carefully over the base lighthouse image.  Then I stamped the bird image from High Tide in Marina Mist angling them up to the right hand corner.  I punched the top right and bottom left corners with a corner rounder punch (now retired).  I stamped the sentiment in Marina Mist on a small layer of Very Vanilla Card and then adhered to a piece of Burlap Ribbon and popped up on dimensionals.


Stamp Set: High Tide
Ink: Night of Navy, Marina Mist, Crumb Cake
Card: Marina Mist, Very Vanilla
Punches: Corner Rounder (retired)
Accessories: Burlap Ribbon, Tear Tape Adhesive, Dimensionals

If you like any of these products you can purchase them through me or on my Online Store.


Wednesday 2 August 2017

Time for a Cuppa

Good Morning Everyone
                                         Thought it was time for a cuppa, like most I enjoy a catching up with a friend over a cup of coffee - it's a great excuse to get together and chat.  This card was creating with that in mind.  I love the combination of blue's and browns together - I have the combination in my house as a testament to how much I love the combo.

To start off with I punched the strip of Crumb Cake on both long edges with the new Ticket Tear Punch.  I sponged the edges of the punched piece and the designer series paper layer with Crumb Cake.  I stamped the Coffee Cup, Sentiment and Lid onto Crumb Cake Ink and then I stamped the Coffee Cup and Lid onto Soft Sky card.  Then I used the Coffee Cups Framelits to cut out the cups and lids and also the belly band in Crumb Cake.  I sponged the Crumb Cake Belly Band in Crumb Cake and adhered to the Soft Sky Coffee Cup.


Stamps: Coffee Cafe
Inks: Early Espresso, Crumb Cake
Card: Crumb Cake, Soft Sky, Coffee Break DSP
Punches: Ticket Tear Border
Big Shot: Coffee Cups Framelits
Accessories: Sponge Daubers, Tear Tape Adhesive, Dimensionals

# Products Available in a Bundle at 10% Discount
Coffee Cafe Stamp Set and Coffee Cups Framelits

I hope you enjoyed this project, if you would like to purchase any of these products they are available at my Online Store.